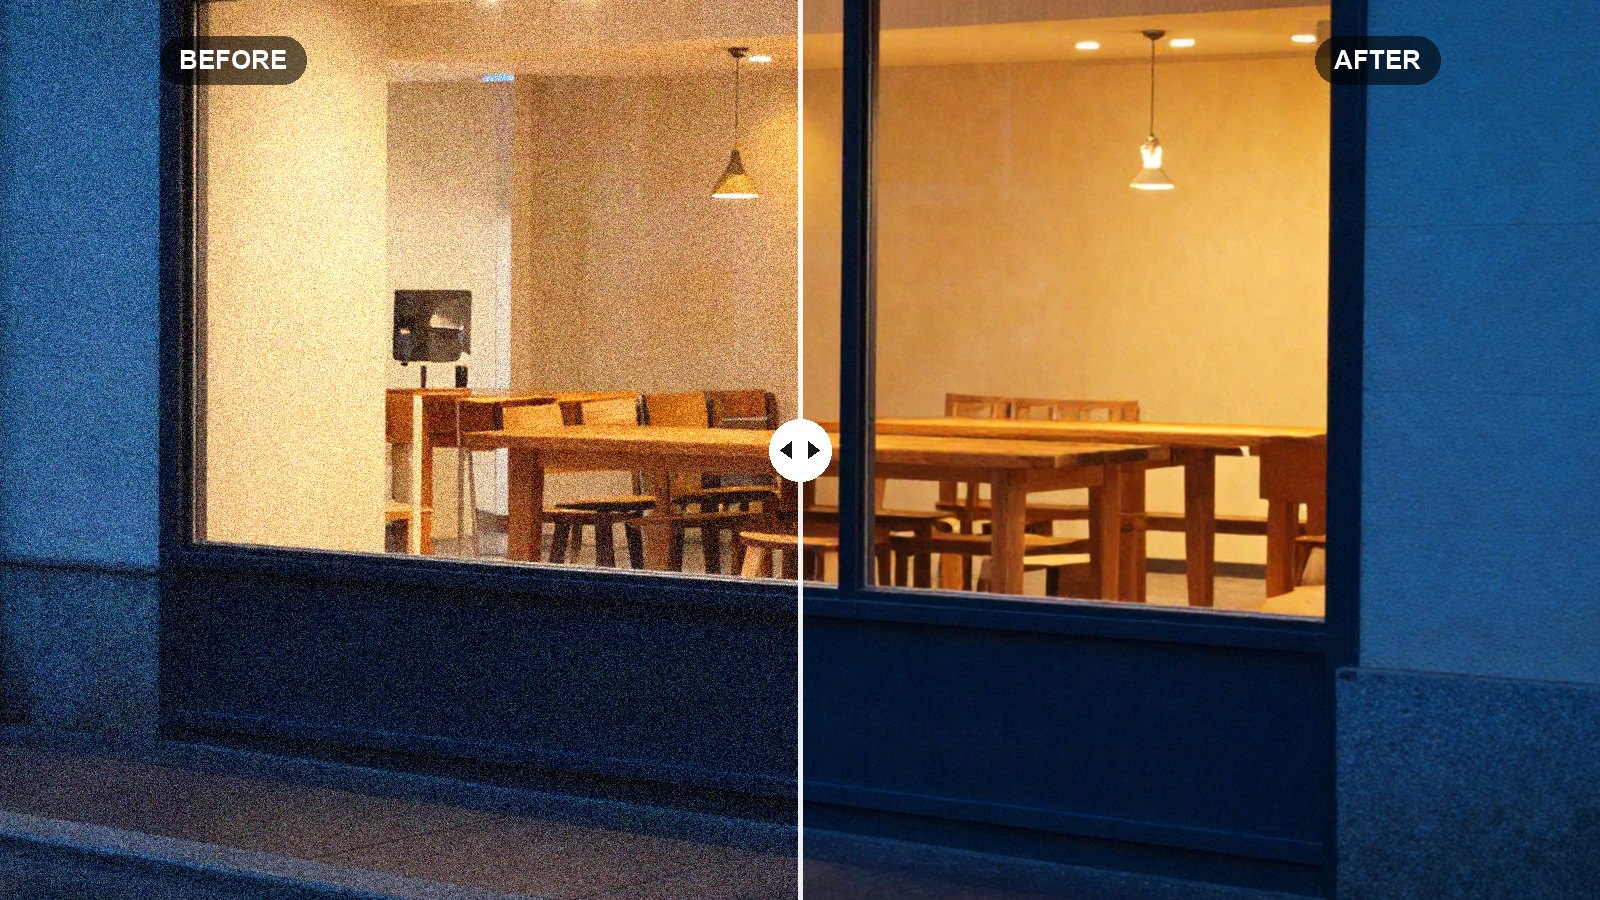
High ISO used to mean a trade-off: either keep the grainy, blotchy noise or smear it away with noise reduction and lose fine detail. Lightroom’s AI Denoise changed that. On a noisy RAW file from a dark concert, a night street or an indoor party, it can clean up the image while keeping eyelashes, fabric texture and hair surprisingly crisp.
It is not always the right tool, though. It works on specific file types, it can take a while on older computers, and in many versions it creates a new file. This Lightroom Denoise guide explains how AI Denoise works, how it compares with the classic Noise Reduction sliders, and when to use each.
Quick answer: Use AI Denoise for RAW photos with visible noise, usually ISO 1600 and up or heavily brightened shadows. In recent versions you run it from the Detail panel or the Enhance command and set an Amount (start around 50). For JPEGs, light noise, or quick edits, the manual Noise Reduction sliders are faster and good enough.
On this page
Two kinds of noise reduction in Lightroom
Lightroom now has two separate approaches, and they do very different things.
- Manual Noise Reduction is the long-standing set of sliders in the Detail panel. It works on any photo, updates instantly, and simply smooths noise by blurring tiny variations.
- AI Denoise uses a trained model to rebuild the image from the raw sensor data. It removes noise and keeps detail far better, but it needs a supported file and takes processing time.
Think of manual noise reduction as a quick polish and AI Denoise as a rescue tool for photos that would otherwise be too noisy to use.
Where to find AI Denoise
Adobe has moved this feature around as it developed, so the exact location depends on your version. In recent versions:
- Lightroom Classic: open the Detail panel in the Develop module and click the Denoise button in the Noise Reduction area. You can also select one or more photos and use Photo > Enhance, which opens the same options alongside Raw Details and Super Resolution.
- Lightroom desktop: open the Detail panel and look for Denoise near the top. Some versions use an Enhance dialog, others apply it directly in the panel.
- Lightroom mobile: recent versions have added Denoise in the Detail panel as well. If you do not see it, your app version or device may not support it yet, and you will only have the manual sliders.
If the button is grayed out, the photo is probably not a supported file type. Adobe’s help pages for your app list which formats work with your version.
How to use AI Denoise step by step
- Start with a RAW file. Denoise reads the raw sensor data, so it works on RAW files from most cameras. JPEGs and other processed files are generally not supported, though Adobe has widened support over time.
- Click Denoise. A dialog or panel appears with a preview of a small area of the photo. Drag inside the preview, or click on the main photo, to check the area you care about most, such as eyes or a textured surface.
- Set the Amount. The slider runs from 0 to 100 and defaults to 50. Try 40 to 60 first. Higher values remove more noise but can start to look smooth or slightly painted.
- Run it. Lightroom shows an estimated processing time in many versions. Let it finish before judging the result.
- Review at 100% zoom. Check skin, hair, foliage and dark areas. If the result looks plastic, run it again with a lower Amount.
Quick tip: Run Denoise early, before masks and heavy local edits. Your existing edits carry over, but it is easier to judge exposure and shadow lifts when you can see the clean image underneath.
The DNG file: what Denoise actually creates
In many versions, especially in Lightroom Classic, Denoise does not change your original RAW file. It writes a brand-new DNG file next to the original, usually with “Enhanced-NR” added to the name, and adds it to your catalog. Your original stays untouched.
That has some practical consequences:
- The new file is large. It is a linear DNG, so it is often several times the size of the original RAW. Running Denoise on a whole shoot uses a lot of disk space.
- Edit the new file, not the original. It appears next to the original in the grid or filmstrip. Make sure you are working on the denoised version before you continue.
- Some settings change behavior. Because the DNG has already been processed, some options, such as running Denoise a second time, may no longer be available on it. Go back to the original if you want a different Amount.
Some recent versions, particularly Lightroom desktop and mobile, can apply Denoise directly within the edit instead of creating a separate visible file. Check what your version does after the first run, so you know which file you are editing and how much storage you are using.
How long does Denoise take?
Speed depends mostly on your graphics processor (GPU) and the file’s resolution. On a recent computer with a capable GPU, a single photo typically takes a few seconds. On an older laptop, or with a very high-resolution camera, it can take a minute or more per image.
If it is slow on your machine:
- Check that GPU acceleration is turned on in Preferences (the Performance tab in Classic).
- Update your graphics drivers on Windows.
- Denoise only the photos you will actually deliver. Pick your keepers first, then batch-process them by selecting several and using Enhance in Classic.
Manual Noise Reduction sliders
For most photos with light noise, the manual sliders are still the fastest choice. They work on JPEGs, update in real time, and do not create new files.
In Lightroom Classic, the Detail panel offers two groups:
| Setting | Value | Why |
|---|---|---|
| Luminance | 15 to 30 | Smooths the grainy speckles in brightness |
| Detail | 50 (default) | Higher keeps more detail but lets some noise back in |
| Contrast | 0 to 20 | Restores a little local contrast lost to smoothing |
| Color | 25 (RAW default) | Removes red and green color speckles |
| Detail (under Color) | 50 (default) | Protects fine colored edges |
| Smoothness | 50 (default) | Evens out larger color blotches |
In Lightroom desktop and mobile, the Detail panel shows a simpler set: Noise Reduction and Color Noise Reduction, with Detail and other refinement sliders appearing once you move them, depending on version.
Zoom to 100% while you adjust these. At fit-to-screen size, noise reduction looks like it is doing nothing, and you will push it too far.
AI Denoise vs manual: when to use which
| Situation | Best choice |
|---|---|
| RAW, ISO 3200 or higher, low light | AI Denoise |
| RAW with shadows lifted by several stops | AI Denoise |
| Phone JPEG or HEIC with light noise | Manual sliders |
| Clean daylight photo at low ISO | Nothing, or a touch of manual |
| Hundreds of event photos on a deadline | Manual first, AI Denoise on the hero shots |
| Images headed for large prints | AI Denoise, checked at 100% |
Some photographers like a bit of noise. On black and white street photos or film-style edits, natural grain can look better than a perfectly clean image. You can also denoise and then add Grain in the Effects panel, which gives a more even, film-like texture than sensor noise.
Denoise and presets
Presets that brighten shadows or add Clarity make noise more visible, which is why a night photo can look fine before a preset and grainy after it. A good order is: Denoise first, then the preset, then adjust Shadows and Clarity if noise reappears.
AI Denoise is not something a regular preset can apply, because it is a separate processing step. Manual Noise Reduction values can be saved into a preset, which is handy for a camera you always shoot at high ISO. See our guide on editing night photos with presets for a full low-light workflow.
Your next edit
Find your noisiest RAW photo and run AI Denoise at 50, then compare it at 100% zoom with a copy cleaned only with the manual sliders. The difference tells you exactly when the extra time is worth it. Then finish the photo with sharpening suited to the new, cleaner file, as explained in our Lightroom sharpening guide.
FAQ
Does Lightroom Denoise work on JPEG files?
Generally no. AI Denoise needs raw sensor data, so it is designed for RAW files. For JPEG and HEIC photos, use the manual Noise Reduction sliders in the Detail panel. Adobe has expanded supported formats over time, so check your version.
Why does Lightroom Denoise create a new DNG file?
In many versions, Denoise produces a processed linear DNG so your original RAW stays untouched. The new file carries your edits but is much larger, so plan for the extra storage.
What Amount should I use for Lightroom Denoise?
Start at the default of 50. Lower it to 30 to 40 if skin or textures look too smooth, and raise it toward 70 only for very noisy, very high ISO photos.
Why is Lightroom Denoise so slow?
It relies heavily on your graphics processor. Older or integrated GPUs, very high-resolution files, and disabled GPU acceleration all slow it down. Updating drivers and processing only your best photos helps.
Keep reading
How to Install Lightroom Presets on Desktop (Classic and CC)
Import .xmp, .zip and legacy .lrtemplate presets in Lightroom Classic and Lightroom desktop, and fix presets that will not show up.
How to Export, Back Up and Share Lightroom Presets
Where your presets live, how to export them as .xmp files, a simple backup routine, and how to share presets that work on other people's photos.
Lightroom Presets vs Profiles: What’s the Difference?
Profiles set how Lightroom renders your photo; presets move the sliders. Here is how they differ and how to use them together.