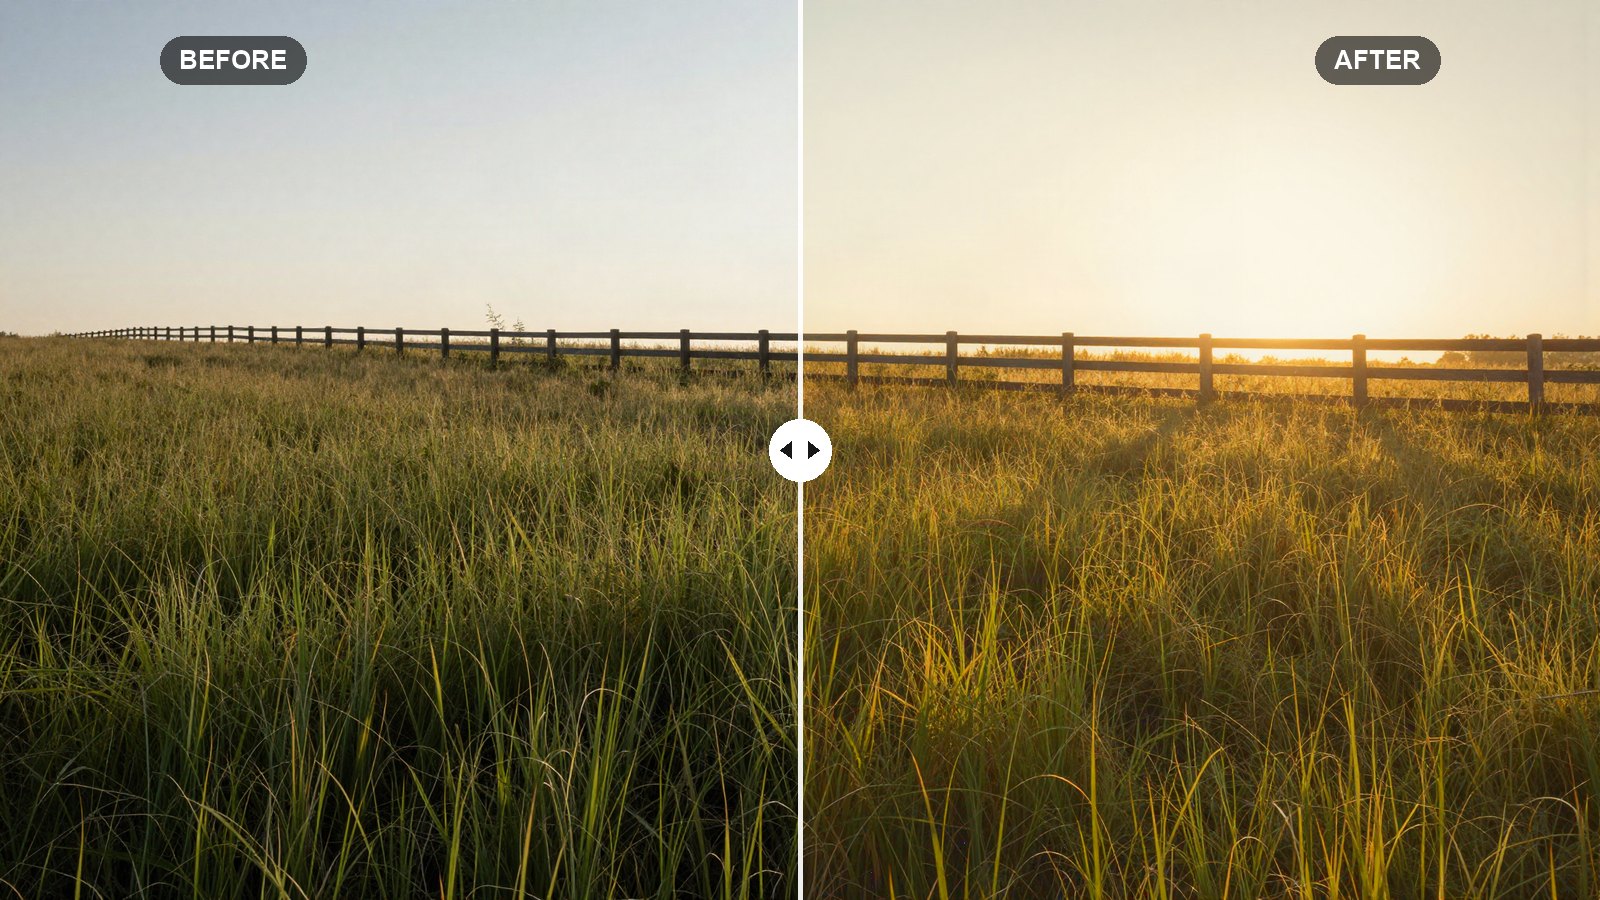
Golden hour, the hour or so after sunrise and before sunset, gives you low, warm, directional light that flatters almost everything. The camera does not always see it the way you remember it, though. Auto white balance often neutralizes the warmth, and a bright sky can push the rest of the frame into shadow.
These golden hour Lightroom preset settings bring that glow back. They boost warm tones, soften contrast slightly, lift the shadows and add a gentle haze. Every slider comes with a reason, and the values work in Lightroom Classic, Lightroom desktop and Lightroom mobile.
Quick answer: For a golden hour glow in Lightroom, pull Highlights down (-45) and lift Shadows (+30), lower Clarity (-8) and Dehaze (-10) for a soft haze, raise Vibrance (+20), boost and brighten oranges and yellows in the Color Mixer, then grade highlights warm gold (hue 45, saturation 20) with Balance at +25.
On this page
Prefer one click? Download the free preset file at the end of this post.
What gives golden hour photos their glow
Real golden hour light has three qualities, and the recipe imitates each one:
- Warm color. Low sun passes through more atmosphere, so the light turns yellow and orange. In Lightroom, that is warm Color Grading in the highlights and midtones plus richer oranges and yellows.
- Soft contrast and haze. Backlit scenes have a gentle bloom around bright areas. Negative Clarity and negative Dehaze recreate that softness.
- Open shadows. The light wraps around subjects instead of carving hard shadows, so Shadows are lifted and the curve brightens the midtones.
The recipe works best on photos that were actually shot near sunrise or sunset: backlit portraits, fields, beaches, city skylines and couples. It can warm up a photo taken in late afternoon, but it cannot turn harsh noon light into golden hour. Overhead light casts short, hard shadows that no slider will fix.
White balance: the most important golden hour setting
White balance is left out of the recipe and the preset file on purpose. Golden hour light changes minute by minute, and your camera may have recorded it anywhere from fairly neutral to deep orange. A fixed Temp value would be wrong on most of your photos.
Set it per photo. Start at As Shot, which usually keeps more warmth than Auto. If the photo looks neutral or cool, move Temp toward yellow until it matches what you remember, then apply the recipe. Be careful with photos that are already very warm: the grading stacks on top, so you may need to cool Temp a little after applying. Our post on why presets look different on every photo explains this in more detail.
The golden hour recipe: every setting
In Lightroom Classic, the first two tables are in the Basic panel. In Lightroom desktop and mobile, tone sliders are under Light, Texture, Clarity and Dehaze under Effects, and Vibrance and Saturation under Color.
Light (tone)
| Setting | Value | Why |
|---|---|---|
| Exposure | +0.15 | A small lift for a sunlit feel. |
| Contrast | +5 | Just enough to keep shape in soft light. |
| Highlights | -45 | Recovers the bright sky and sun glow. |
| Shadows | +30 | Brings faces and foregrounds out of backlit shadow. |
| Whites | +5 | Keeps the sun area bright without clipping more. |
| Blacks | -10 | Holds some depth so the soft look does not go flat. |
Presence
| Setting | Value | Why |
|---|---|---|
| Texture | 0 | Left neutral. |
| Clarity | -8 | Adds a soft glow around bright edges. |
| Dehaze | -10 | Adds warm atmospheric haze. |
| Vibrance | +20 | Lifts muted warm tones without overdoing skin. |
| Saturation | 0 | Left alone; Vibrance and the Color Mixer do the work. |
Tone curve (point curve)
| Setting | Value | Why |
|---|---|---|
| Curve point 1 | Input 0 / Output 10 | A small lift so shadows feel airy, not crushed. |
| Curve point 2 | Input 64 / Output 66 | Dark tones nearly unchanged. |
| Curve point 3 | Input 128 / Output 135 | Brighter midtones for a sunlit glow. |
| Curve point 4 | Input 192 / Output 200 | Lifts the light tones. |
| Curve point 5 | Input 255 / Output 250 | Softens pure white around the sun. |
In Lightroom Classic, open Tone Curve and switch to Point Curve. In Lightroom desktop and mobile, open Light, then Curve, and choose the white point-curve circle. Drag each point while watching the input and output readout; close is good enough.
Color Mixer (HSL)
| Setting | Value | Why |
|---|---|---|
| Red (Hue / Sat / Lum) | +10 / +5 / 0 | Pulls reds toward warm orange. |
| Orange (Hue / Sat / Lum) | +5 / +15 / +10 | Richer, brighter skin and sunlit surfaces. |
| Yellow (Hue / Sat / Lum) | -20 / +10 / +10 | Turns yellows golden and bright. |
| Green (Hue / Sat / Lum) | -40 / -25 / -5 | Shifts greens toward warm yellow-green and calms them. |
| Aqua (Hue / Sat / Lum) | 0 / -30 / 0 | Removes cool tones that fight the warmth. |
| Blue (Hue / Sat / Lum) | -10 / -25 / -10 | A softer, deeper sky that does not compete. |
| Purple (Hue / Sat / Lum) | 0 / -20 / 0 | Cleans purple fringing around the sun. |
| Magenta (Hue / Sat / Lum) | 0 / -10 / 0 | Keeps pink clouds natural. |
In Classic this is the HSL/Color panel. In Lightroom desktop and mobile it is Color, then Color Mixer (the button may read Mix on mobile).
Color Grading
| Setting | Value | Why |
|---|---|---|
| Shadows (Hue / Sat / Lum) | 20 / 8 / 0 | Warm red-orange shadows, the way warm light fills them. |
| Midtones (Hue / Sat / Lum) | 35 / 10 / 0 | Amber warmth through the middle tones. |
| Highlights (Hue / Sat / Lum) | 45 / 20 / 0 | The golden glow itself. |
| Global (Hue / Sat / Lum) | 0 / 0 / 0 | Not needed; the three wheels cover it. |
| Blending | 60 | Smooth overlap between the warm tints. |
| Balance | +25 | Gives the golden highlight tint more of the frame. |
Want to see how these wheels interact? Our Lightroom Color Grading guide walks through each control.
Effects
| Setting | Value | Why |
|---|---|---|
| Vignette Amount | -10 | A subtle darkening that keeps the light central. |
| Vignette Midpoint | 50 | Default placement. |
| Vignette Feather | 60 | Soft edges so it looks like natural fall-off. |
No grain. Golden hour photos look best clean, and grain fights the soft glow.
Tip: For extra sun glow, add a Radial Gradient mask where the sun sits, then raise Temp, Exposure (about +0.3) and lower Dehaze inside it. Our Lightroom masking guide shows how to draw and feather radial gradients on desktop and mobile.
How to apply the recipe
- Open a photo shot near sunrise or sunset and reset it.
- Set white balance, starting from As Shot.
- Enter the Light and Presence values.
- Build the five-point curve.
- Enter all eight Color Mixer rows.
- Set the Color Grading wheels, Blending and Balance.
- Add the vignette.
- Save as a preset with White Balance unchecked.
Adapting the golden hour look
- Too orange: cool Temp first, then lower Highlights saturation in Color Grading from 20 to 12.
- Skin too red: lower Red Saturation to -5 and Orange Saturation to +5.
- Looks hazy and flat: set Dehaze to 0 and Contrast to +15.
- Sky blown out: lower Highlights to -70 or use a Select Sky mask to darken only the sky.
- Afternoon photo: warm Temp more and raise Midtones saturation in Color Grading to 15.
Common golden hour editing mistakes
Stacking warmth. Warm white balance, warm grading and boosted oranges add up fast. If white shirts look orange, pull one of them back.
Too much haze. Negative Dehaze past -20 turns the image milky. Keep it light.
Faking golden hour on noon light. Warm tones on short, hard midday shadows look odd. The recipe enhances real low-sun light best.
Your next edit
Start with these values, set white balance per photo, and watch for stacked warmth. When you want a bolder, more cinematic warm-and-cool split, try our orange and teal Lightroom settings.
FAQ
What are good golden hour Lightroom preset settings?
Try Highlights -45, Shadows +30, Clarity -8, Dehaze -10, Vibrance +20, richer and brighter oranges and yellows in the Color Mixer, and warm Color Grading with highlights at hue 45 and saturation 20.
Can I make a photo look like golden hour if it was not?
You can add warmth to late-afternoon photos, but it will not look real on harsh noon light. Low sun creates long, soft shadows that sliders cannot invent.
Should I use As Shot or Auto white balance for sunset photos?
As Shot usually keeps more of the warm light. Auto often neutralizes it, which removes the glow you wanted to keep.
Why does my golden hour edit look too orange?
Warmth is being added in several places at once. Cool Temp a few points or lower the Color Grading highlight saturation until whites look warm but not orange.
Download the free preset
LRP Golden Hour as an .xmp file for Lightroom Classic, Lightroom desktop and Lightroom mobile. White balance is left out on purpose, so set it per photo.
Not sure how to add it? See desktop install or mobile install.
Keep reading
How to Edit Photos With Presets: A Step-by-Step Workflow
The full preset workflow we use on almost every photo, from picking a preset and setting its Amount to masks, finishing touches and export.
Bright and Airy Lightroom Preset Settings: Full Recipe
Copy our bright and airy Lightroom recipe, slider by slider, for clean whites, soft shadows and gentle pastel color on any well-lit photo.
Edit Night Photos with Lightroom Presets: Noise and Lights
Daylight presets struggle after dark. Here is the order that works for night and city-light photos: noise, preset, white balance, highlights, masks.