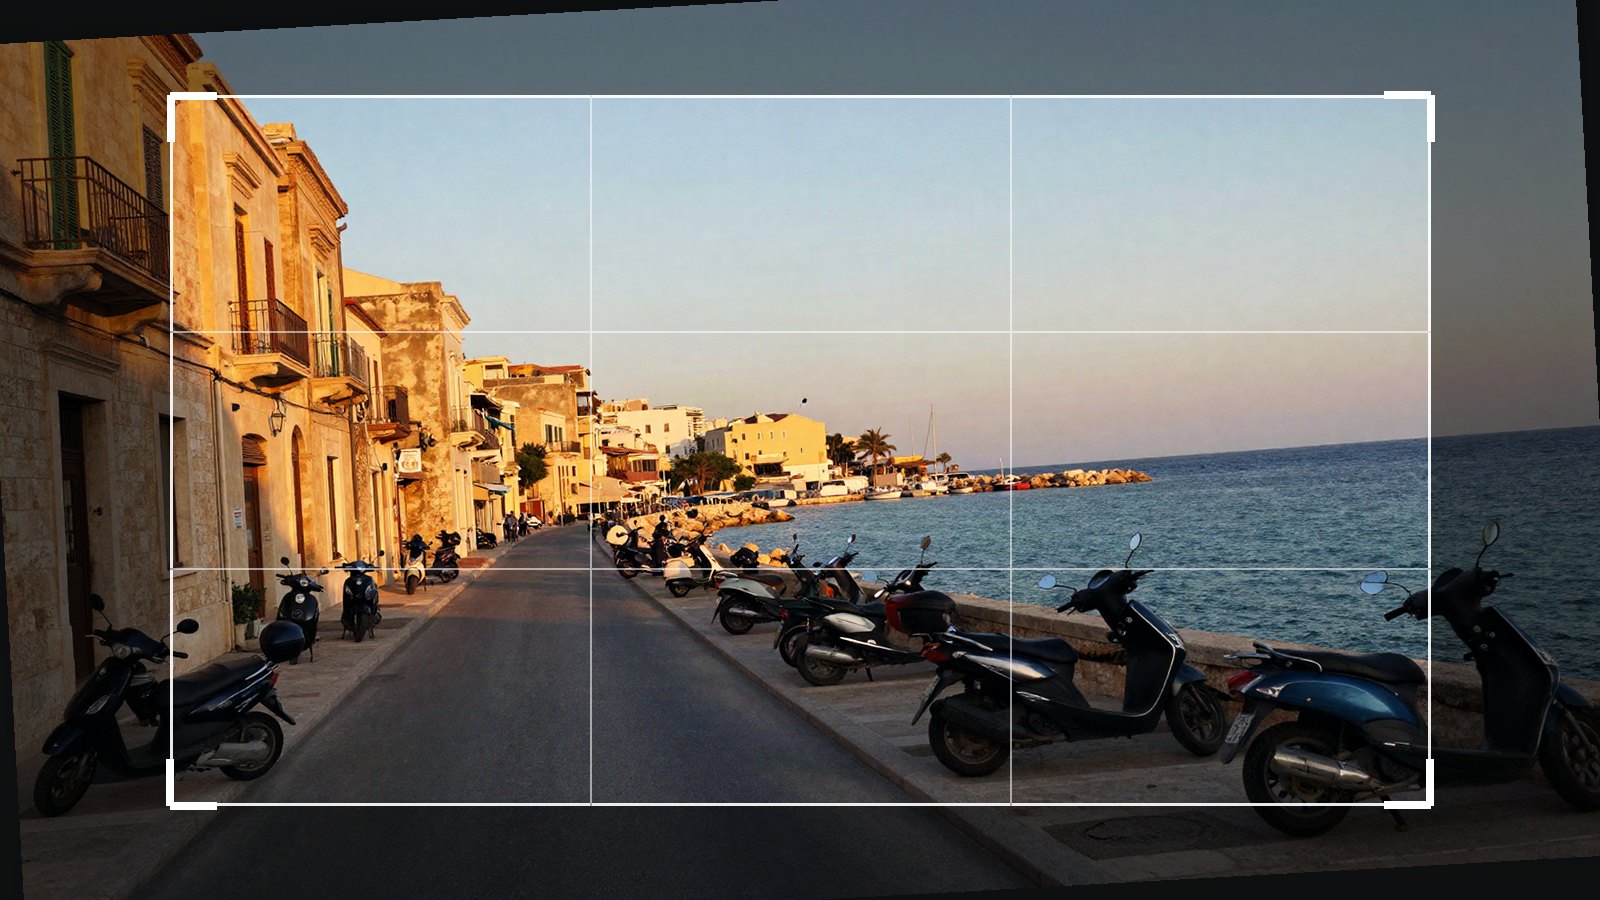
A tilted horizon is the first thing people notice and the last thing most editors fix. No preset, however good, can rescue a photo that leans two degrees to the left or has buildings falling backward. Cropping and straightening take thirty seconds and change how finished a photo feels more than almost any color choice.
This Lightroom crop and straighten guide covers the Crop tool, aspect ratios for print and social, the Straighten tool and its Auto button, and Upright in the Geometry panel (Transform in Lightroom Classic), including Guided Upright for tricky architecture.
Quick answer: Open the Crop tool (R in Lightroom Classic, C in Lightroom desktop), pick an aspect ratio, then click Auto or drag the Straighten tool along a line that should be level. For converging verticals, use Upright in the Geometry panel (Transform in Classic): try Auto first, then Guided for full control.
On this page
Where the crop and straighten tools live
The tools are the same idea in every version of Lightroom, but they sit in slightly different places.
- Lightroom Classic: in the Develop module, click the Crop Overlay icon under the histogram or press R. The panel shows Aspect, the Straighten tool with an Auto button, and an Angle slider.
- Lightroom desktop: click the Crop & Rotate icon in the right-hand tool column or press C. You get Aspect Ratio, Straighten with Auto, Angle, plus rotate and flip buttons.
- Lightroom mobile: tap Crop in the bottom toolbar of the editor. Aspect ratio presets, Auto, rotate and flip are along the bottom, with an angle dial you can drag.
Upright perspective correction is separate from the Crop tool. In Lightroom Classic it is in the Transform panel. In Lightroom desktop and mobile it is in the Geometry panel.
How to crop in Lightroom
- Open the Crop tool for your version.
- Choose an aspect ratio from the Aspect menu, or leave it on Original or As Shot to keep the camera’s shape.
- Make sure the lock icon is closed if you want the ratio to stay fixed while you drag.
- Drag a corner handle inward to crop. Drag inside the frame to reposition the image under the crop.
- Press Enter (Return on Mac), or click Done, to apply. In Classic, pressing R again also closes the tool.
Cropping in Lightroom is always non-destructive. You can come back months later, open the tool, and drag the edges back out to the full frame.
Useful crop shortcuts in Lightroom Classic
- X flips the crop between landscape and portrait orientation while keeping the ratio.
- O cycles the overlay: Grid, Thirds, Diagonal, Triangle, Golden Ratio, Golden Spiral and others.
- Shift + O rotates the orientation of the triangle and spiral overlays.
- A toggles the aspect lock on and off.
Lightroom desktop shares several of these, but not all. If a key does nothing, check the keyboard shortcuts list under the Help menu for your version.
Choosing an aspect ratio
Pick the ratio for where the photo will end up, not just for how it looks on screen. Cropping a 3:2 camera file to 4:5 for Instagram removes a fair amount of width, so leave room around your subject when you shoot.
| Ratio | Common use | Notes |
|---|---|---|
| 3:2 (As Shot on most cameras) | Prints at 4×6, general use | Most interchangeable-lens cameras shoot this natively. |
| 4:3 | Phone photos, many compact cameras | The default for most phone cameras. |
| 4:5 | Instagram portrait posts, 8×10 prints | Takes up more of the feed than a square. |
| 1:1 | Square posts, profile pictures | Works well with centered subjects. |
| 16:9 | Video thumbnails, desktop wallpapers, cinematic looks | Pairs well with an orange and teal grade. |
| 9:16 | Stories and Reels covers | Use Custom, or flip 16:9 to portrait. |
Social platforms change their supported sizes from time to time, so check the current guidelines before cropping a whole set. If you post a series, keep one ratio for all of them. Mixed ratios are one of the quickest ways to make a feed look messy, as we cover in our guide to a consistent Instagram feed.
How to straighten a photo
You have three ways to level a horizon, and they all set the same Angle value underneath.
1. Auto
Click Auto in the Crop tool. Lightroom looks for strong horizontal and vertical lines and rotates to match. It works well on seascapes, flat horizons and buildings shot straight on. It can get confused by sloping hills, tilted trees or a beach that curves away.
2. The Straighten tool
Click the level icon (the Straighten tool) and drag a line along something in the photo that should be perfectly horizontal or vertical, like a horizon, a door frame or a windowsill. Lightroom rotates the image so that line becomes level. In Lightroom Classic, you can also hold Ctrl (Windows) or Cmd (Mac) while the Crop tool is open to switch to the Straighten tool temporarily.
3. The Angle slider or dial
Drag the Angle slider, which runs from -45 to +45 degrees, or drag outside a corner of the crop box to rotate by hand. A grid appears while you rotate, which makes fine adjustments easier. Small corrections are normal: most handheld horizons are off by less than three degrees.
Tip: Level the horizon you can see, not the one you think is there. On a beach with waves washing in at an angle, use the far line where sea meets sky. In a room, use a vertical door frame near the center of the image, since edges near the corners are often bent by the lens.
Upright: fixing perspective in the Geometry panel
Straightening rotates the whole photo. It cannot fix buildings that lean inward because you tilted the camera up. That is what Upright does. It warps the image so vertical and horizontal lines become parallel.
Before using Upright, turn on lens profile corrections (Lens Corrections panel in Classic, Optics in Lightroom desktop and mobile). Removing barrel distortion first gives Upright straighter lines to work with.
Upright offers these modes. Labels are the same across versions, though their position in the panel may shift slightly:
- Auto: a balanced correction of level, vertical and horizontal perspective. The best first click.
- Level: only fixes rotation, similar to Auto in the Crop tool.
- Vertical: levels the image and makes vertical lines parallel. Good for buildings shot from the street.
- Full: corrects level, vertical and horizontal perspective all at once. Strong, and often too strong.
- Guided: you draw the lines yourself.
Guided Upright, step by step
- In Lightroom Classic, open the Transform panel and select the Guided Upright tool (Shift + T). In Lightroom desktop or mobile, open Geometry and choose Guided under Upright.
- Draw a guide along an edge that should be vertical, such as the side of a building.
- Draw a second guide along another vertical edge. Two vertical guides fix converging verticals.
- Add up to two horizontal guides if the horizontal lines also need correcting. Lightroom accepts up to four guides.
- Use the loupe that appears while drawing to place the ends of each line precisely.
Manual transform sliders
Below Upright you will find Vertical, Horizontal, Rotate, Aspect, Scale, Offset X and Offset Y. After a strong vertical correction, buildings often look squat and wide. Raise Aspect by 10 to 25 to make them look taller and more natural. Use Scale to zoom in slightly and hide the blank edges, or tick Constrain Crop in Classic to crop them out automatically.
Full correction is not always the goal. Pulling verticals to perfectly parallel on a tall tower can look unnatural. We often leave a little convergence in, by easing the Vertical slider back toward 0 after Upright, so the building still feels tall.
Order of operations
We follow this order on most photos:
- Enable lens profile corrections and chromatic aberration removal.
- Apply Upright or straighten.
- Crop to your final aspect ratio.
- Apply a preset and do your color and tone work.
- Add any vignette last, since Post-Crop Vignetting follows the final crop.
Doing geometry first means you judge color on the image you will actually publish, and edge areas that get cropped away do not distract you. It also matters for batch work: crop and Upright settings can be synced across similar shots, but check each frame, since a crop that suits one photo can cut a head off in the next. Our batch editing guide explains how to leave Crop out of a sync.
Crop and presets
Most presets do not include crop, and that is a good thing. If you save your own preset, leave Crop, Transform and Lens Corrections unchecked unless every photo it touches was shot the same way. A crop baked into a preset will chop photos it was never designed for. See how to create your own Lightroom preset for which boxes to tick.
Your next edit
Open the last ten photos you edited and check every horizon with the Straighten tool. You will probably find at least two that lean. Fix them, choose one aspect ratio for the set, and then move on to the finishing details with our Lightroom sharpening guide.
FAQ
How do I straighten a photo in Lightroom mobile?
Tap Crop in the bottom toolbar, then tap Auto to level the photo automatically, or drag the angle dial until the grid lines up with your horizon. For leaning buildings, open the Geometry panel and try Upright.
Why does Lightroom crop my photo when I straighten it?
Rotating a rectangle leaves empty corners. Lightroom crops in just enough to hide them while the crop is constrained to the image. The bigger the angle, the more it crops, so shoot as level as you can.
What is the difference between Straighten and Upright?
Straighten only rotates the whole photo. Upright corrects perspective, making vertical or horizontal lines parallel by warping the image. Use Straighten for horizons and Upright for buildings and interiors.
Can I undo a crop in Lightroom?
Yes. Crops are non-destructive. Open the Crop tool and drag the edges back out, or use Reset in the Crop panel to return to the full original frame.
Keep reading
Lightroom Remove Tool Guide: Heal, Clone and Generative AI
Content-Aware Remove, Heal, Clone or Generative Remove? Which mode to pick, the settings that matter, and fixing dust fast.
Lightroom Presets vs Profiles: What’s the Difference?
Profiles set how Lightroom renders your photo; presets move the sliders. Here is how they differ and how to use them together.
Lightroom Tone Curve Guide: S-Curves, Fades and RGB Curves
How Lightroom's Tone Curve really works, with exact points for an S-curve, a matte fade and subtle RGB channel tints.